MySQL Error “MyISAM-table ‘/path/to/table is usable but should be fixed”

Notes: This is a troubleshooting article for MyISAM tables.
For the sake of this article we are going to call the database, database and the table tablename. Please edit to match your database and tablename

Upon a database restart we saw the following error pop up in my logs.

MySQL Error “MyISAM-table ‘/path/to/table/tablename‘ is usable but should be fixed”

I ran a

mysql>check table database.tablename

and got:

+————————–+——-+———-+———-+
| Table | Op | Msg_type | Msg_text |
+————————–+——-+———-+———-+
| database.tablename | check | status | OK |
+————————–+——-+———-+———-+

This was only viewable with myisamchk -c , in other words a definition file error.

While the obvious method of fixing the table is a myisamchk -r it can also be disruptive so we wanted to make it a last ditch effort.  So we came up with some creative solutions.

As we had access to query my table we decided on the following course of action:

  1. create a new table from the existing data and swap the tables – lets call the new table new_table:

    mysql>use database;

    mysql>create table new_table like tablename;

    mysql>insert into new_table select * from tablename;

    mysql>rename table tablename to tablename_orig,
    new_table to tablename;

    (This option was the one that worked in the end but the database needed a restart. More on this below)

  2. If that failed create a mysqldump of the data, drop the table and restore from the dump:

    bash>mysqldump -p –add-drop-tables database tablename > file.sql

    bash> mysql -p database < file.sql

  3. myisamchk repair, which involves taking down of the database service. (For full details see here ) :

    bash>service mysqld stop

    bash>myisamchk -r -q /path/to/table/tablename

As mentioned earlier option one was the one that worked in the end, but not so smoothly.

The issue was that when we checked the original renamed table had no error and the new renamed  table still carried the error. This lead us to think a restart may make everyone realize the table was new and the error would go away. When restarting the database we found that the error was gone and we didn’t have to continue with the repair attempts. Obviously this was the best possible option because it was the least disruptive.


mysqldump from a 5.6 to 5.7 Server

Creating a new slave often involves taking a mysqldump of the master in order to make the slave databases identical. The expectation is that when you dump from one to the other and login and everything will  just be the same as the other server. Unfortunately this is not the case when significant changes are made to the to the structure of the mysql database as happened in 5.7.  Unfortunately when I tried to log into my newly duplicated database to set up replication I ended up with a nasty error:

mysql -u newuser -p
Enter password:
ERROR 1524 (HY000): Plugin ‘*ABCD23FA83717D03123456789029E48874889829’ is not loaded

Let us under stand the why and then discuss the how.

This is a sample row from the 5.6 mysql.user table:

Host: localhost
User: newuser
Password: *ABCD23FA83717D03123456789029E48874889829
Select_priv: N
Insert_priv: N
Update_priv: N
Delete_priv: N
Create_priv: N
Drop_priv: N
Reload_priv: N
Shutdown_priv: N
Process_priv: N
File_priv: N
Grant_priv: N
References_priv: N
Index_priv: N
Alter_priv: N
Show_db_priv: N
Super_priv: N
Create_tmp_table_priv: N
Lock_tables_priv: N
Execute_priv: N
Repl_slave_priv: Y
Repl_client_priv: N
Create_view_priv: N
Show_view_priv: N
Create_routine_priv: N
Alter_routine_priv: N
Create_user_priv: N
Event_priv: N
Trigger_priv: N
Create_tablespace_priv: N
ssl_type:
ssl_cipher:
x509_issuer:
x509_subject:
max_questions: 0
max_updates: 0
max_connections: 0
max_user_connections: 0
plugin: mysql_native_password
authentication_string: NULL
password_expired: N

This is a row in the 5.7 mysql.user table:

Host: localhost
User: newuser
Select_priv: N
Insert_priv: N
Update_priv: N
Delete_priv: N
Create_priv: N
Drop_priv: N
Reload_priv: N
Shutdown_priv: N
Process_priv: N
File_priv: N
Grant_priv: N
References_priv: N
Index_priv: N
Alter_priv: N
Show_db_priv: N
Super_priv: N
Create_tmp_table_priv: N
Lock_tables_priv: N
Execute_priv: N
Repl_slave_priv: N
Repl_client_priv: N
Create_view_priv: N
Show_view_priv: N
Create_routine_priv: N
Alter_routine_priv: N
Create_user_priv: N
Event_priv: N
Trigger_priv: N
Create_tablespace_priv: N
ssl_type:
ssl_cipher:
x509_issuer:
x509_subject:
max_questions: 0
max_updates: 0
max_connections: 0
max_user_connections: 0
plugin: mysql_native_password
authentication_string: *ABCD23FA83717D03123456789029E48874889829
password_expired: N
password_last_changed: 2016-08-01 15:56:03
password_lifetime: NULL
account_locked: N

Notice the password field is gone in the 5.7 table and the authentication_string field is now in use.

When you run a mysqldump, a drop table statement is added to the dump to be run before the table is recreated and the data restored to it. This left me with a 5.6 mysql.user table structure within a 5.7 database.  This left me with an entry that looked as follows:


Host: localhost
User: newuser
Password:
Select_priv: N
Insert_priv: N
Update_priv: N
Delete_priv: N
Create_priv: N
Drop_priv: N
Reload_priv: N
Shutdown_priv: N
Process_priv: N
File_priv: N
Grant_priv: N
References_priv: N
Index_priv: N
Alter_priv: N
Show_db_priv: N
Super_priv: N
Create_tmp_table_priv: N
Lock_tables_priv: N
Execute_priv: N
Repl_slave_priv: Y
Repl_client_priv: N
Create_view_priv: N
Show_view_priv: N
Create_routine_priv: N
Alter_routine_priv: N
Create_user_priv: N
Event_priv: N
Trigger_priv: N
Create_tablespace_priv: N
ssl_type:
ssl_cipher:
x509_issuer:
x509_subject:
max_questions: 0
max_updates: 0
max_connections: 0
max_user_connections: 0
plugin: *ABCD23FA83717D03123456789029E48874889829
authentication_string: NULL
password_expired: N


The good news is that there is a very quick and easy fix for this. Running mysql_upgrade immediately after the dump will upgrade the mysql database back to 5.7 undoing the damage caused to the user entries by the dump from 5.6.

  1. Dump your database:
    mysqldump -u root -p  –routines –events –triggers –all-databases > file.sql
  2. Restore:
    mysql -u root -p < file.sql
  3. Run a mysql schema upgrade as would be done after an upgrade:
    mysql_upgrade -u root -p

Obviously if you are working on a database that is being updated, the active database needs to be readlocked until the dump is completed and a show master status has been run. If you are new to setting up a master/slave scenario read this.

CSeq Headers in SIP

I recently came across a case where a client’s system was ignoring BYEs sent to them. They claimed this was due to the fact that the Cseq header in the BYE should have been incrementally higher than the previous requests they (the UAC) had started. This means they sent:

CSeq: 1 INVITE

on their initial INVITE request.

CSeq: 2 PRACK

in their Prack request and then expected to see 3 BYE sent by the UAS when this had been the first request initiated by the UAS.  The initial INVITE and PRACK were initiated by the UAC not the UAS thus bound by a different numbering schemes. It seems that this is a common misconception in the reading of the RFC.

SIP RFC 3261 does indicate that the CSeq header values MUST be incremental but it depends of the party initiating the request. Section 12.2.1.1 of this RFC states:

Requests within a dialog MUST contain strictly monotonically increasing and contiguous CSeq sequence numbers (increasing-by-one) in each direction (excepting ACK and CANCEL of course, whose numbers equal the requests being acknowledged or cancelled).  Therefore, if  the local sequence number is not empty, the value of the local sequence number MUST be incremented by one, and this value MUST be placed into the CSeq header field.  If the local sequence number is  empty, an initial value MUST be chosen using the guidelines of Section 8.1.1.5.  The method field in the CSeq header field value MUST match the method of the request.

Section Section 8.1.1.5 only speaks about the guidelines of choosing numbers for the CSeq headers. As the BYE was the first request initiated by the UAS, despite the two initiated by the UAC, the UAS is well within its rights to send a CSeq header stating 1 BYE.
(Note: Section 8.1.1.5 just mentions that the value must be a 32-bit unsigned integer lower than 2^31).

An Update Before Trigger to Reject Insertion in MySQL

It came to my attention this week that a specific UPDATE statement via a web application was causing absolute chaos with another component in the system. There were two answers with regards to how to fix this:

1) Wait for the web developer to find time to patch the web application, though this could cause a user with access to the database to make the same error.

2) Create a BEFORE trigger to prevent the change from happening both through the application and via a database client

Even for those proficient in SQL triggers can be a bit tricky in MySQL so having a base for comparison to other queries can be a useful jumping point.

I found it quite easy to find examples of triggers that prevented rows from being deleted or inserted but finding an example of an UPDATE  trigger that was not convoluted and stopped an update in an intuitive manner was more difficult. Where simplicity can be obtained a complexity causes unnecessary problems. The specific situation I was dealing with was a specific ID being used twice in a single row. An id could not be its own parent and when that happened it caused issues. It was not something that made sense to do when you understood the connection between the two fields but it still happened.

Below is trigger preventing that from happening – it does the job in both 5.5 and 5.6. Let us say that our table is called test:

DELIMITER ;;

CREATE TRIGGER parentid_cannot_match_id
BEFORE UPDATE on test_table
FOR EACH ROW
BEGIN
IF (NEW.parentid = OLD.id)
THEN
SIGNAL SQLSTATE ‘45000’ SET MESSAGE_TEXT = ‘An id cannot be its own Parent’;
END IF;
END;;

DELIMITER ;

I am going to break this down so that it can be edited to another similar specification. Note that triggers work on a per database level so if you have multiple databases on the same server make sure you are using the correct database at the time via the USE database statement. If our database is testdb the statement would be:

mysql>Use testdb;

Now the statement:

*DELIMITER ;;

The delimiter is necessary so that despite the semicolons, which usually act as delimiter in MySQL, being used within the trigger it doesn’t cause the query to be run just until the point of the next semicolon.  It is a separate query essentially but necessary and is run at the same time as the create trigger statement.

*CREATE TRIGGER parentid_cannot_match_id

This is the start of the create a trigger statement itself and then states the name of a trigger. It cannot match the name of another trigger nor be similar to another trigger being run on the same table.

*BEFORE UPDATE on test_table

This states that this is a BEFORE trigger NOT an AFTER trigger. An after trigger would be useless at this point because the action on the table would have already happened, defeating the purpose of preventing said action. Our table name is test_table so it is saying before any update on test_table.

*FOR EACH ROW

This row states that following this phrase is the body of the trigger which is to be performed on each row being affected by the trigger.

*BEGIN

The rows before this keyword are necessary parts of any trigger. When we see statement that begins with BEGIN followed by END multiple arguments are allowed in the middle for these two keywords which form a compound statement construct. As we are working an IF (.. THEN) statement it is considered a compound statement even though we are only concerned with a single argument. This can also be used to use for multiple arguments as you cannot have similar triggers on the same table.

*IF (NEW.parentid = OLD.id)

This is the parameter I am looking for that I find to be unacceptable. The NEW and OLD keywords are used within triggers to differentiate between the NEW (post update values) and OLD (pre-update values). Both the NEW and OLD keywords were necessary for this trigger to target the single line I was interested in. Without the OLD and NEW keywords or just using the NEW keyword no row’s ‘parentid’ could be updated with an already existing id value which was problematic. If you were running a regular SQL query for information ‘parentid=id’ would be a valid way of stating that you want results where ‘parentid’ is equal to ‘id’ but in triggers it does not work the same way. After the OLD keyword was tagged on to ‘id’ it specified I was referring to that specific row pre-update and post update.

*THEN

If the IF statement finds a positive result, do the following next.

*SIGNAL SQLSTATE ‘45000’ SET MESSAGE_TEXT = ‘An id cannot be its own Parent’;

The SIGNAL keyword will cause MySQL to return and error which will be whatever SQLSTATE I specify (more on that here). 45000 is a generic error which states that this error is specific to a user condition, which is essentially what we are doing by saying send this error if it meets the criteria in the IF statement. As it is a user defined error we should specify what is causing this error. This error will show up if you are running the disallowed query from commandline or a MySQL client. The application, in my case the web application, will not necessarily show you the error specified unless the code tells it to do so. It may have a default for any error.

*END IF;

Here we end the IF (THAN) statement.

*END;;

Here we end the BEGIN (END) statement.

*DELIMITER ;

Then we change the delimiter back to a single semicolon. Note this is a separate query from the trigger so if you are running this via commandline you will have to press enter again if you do not include a line break after the statement.

For more information on triggers see the MySQL documentation which is very readable for this specific topic.

The Truth About the NoSQL versus RDBMS Debate (As I See It)

I spent a long time denying the importance of NoSQL. I knew it was out there but after reading this article I decided to give it a try. Over the last few weeks I have been taking a free MongoDB course and have really been enjoying it.  It got me thinking that this was the way forward and maybe that  was me buying into all the propaganda a bit. The truth of the matter is, after spending some time researching the topic, relational databases are just not ‘sexy’ but still have life left in them.

During my dissertation I came across articles in journals about Facebook, Twitter and Digg giving MySQL the heave-ho in favour of Cassandra. In university you are made to believe that peer reviewed journals are like the word of God. So I decided to reread some of the source material I used in my dissertation to see if I maybe got it wrong. What I found was that the only mention of MySQL in the article by Lakshman and Malik (2009) of Facebook is as follows:

“Before launching the Inbox Search application we had to index 7TB of inbox data for over 100M users, then stored in our MySQL[1] infrastructure, and load it into the Cassandra system. The whole process involved running Map/Reduce[7] jobs against the MySQL data files, indexing them and then storing the reverse-index in Cassandra.”

This made me think while Cassandra didn’t fit my dissertation requirements it seemed to be working for Facebook.  Kim and Schulzrinne (2011) reaffirmed this fact when talking about how great a solution NoSQL was for SIP networks:

“Cassandra is a P2P-based key-value store which is used by Facebook, Twitter, and Digg. Its scalability and self-organizing properties are the main reason it was chosen.”

While none of them specifically mentioned the dumping of their relational databases this is the direction I felt the articles were leading me to believe.

Then earlier in the week I was at the OpenStack conference and I brought up the topic with one of the panellists of NoSQL databases being favoured and relational databases being dropped. I mentioned Twitter and Facebook and was informed that despite much effort to discard them completely neither has been able to. My thoughts moved to Trove, the database administration tool for OpenStack, and how it could manage MySQL and MongoDB simultaneously and I was wondering why was that necessary. It got me thinking further as to why they were both so necessary to the functioning of massive systems where NoSQL seemed to have the obvious advantage. Something I thought was a given turned into a he said/she said topic. Its true that a lot of the blogs and articles are written by very biased writers either pushing the major benefits of the NoSQL software they are using or telling you how to make your MySQL database more NoSQL-like while keeping with the ACID (Atomicity, Consistency, Isolation, Durability) principles that according to some is a difficult nut to crack. That said the Google Spanner project claims (as stated in Corbett, et al., 2012) to have overcome that discarding a MySQL based application, but I digress.

So why is this so called long lived so called antiquated relational database technology so important? Why hadn’t it gone the way of the dodo when the all powerful NoSQL architecture came on to the scene? In my opinion structure, which is something the document based models of NoSQL eschew, can be key for some applications that need it for all their joins and foreign keys etc. The flexibility that NoSQL raves about adds some management difficulty. Basically said I agree in some regard with this guy, and more with this guy though not totally with either. If you need both you aspects you may just need both data storage models. Before you start arguing for your favourite method hear me out.

A lot of bloggers and case studies tend to focus on one versus the other. The big fight over scalability and flexibility over structure, familiarity and ACID principles. Very few seem to understand that using both together for different aspects of the same product can work. What Twitter and Facebook are doing by trying to bury their ‘unsexy secret’ is strengthening the world view that one has to be better than the other for a given situation. People neglect to mention that even ‘big fish’ maintain both and the size of your company or data doesn’t dictate what type of heterogeneous database model you use. Its based on personal need and sometimes avoiding the complexity is better for you and sometimes the flexibility is worthwhile but sometimes both can be useful.

One of the conclusions I came across in my reading stated that SQL and NoSQL have nothing to do with each other, which I will agree with, but it makes both useful instead of making them interchangeable. When people jumped on Facebook and Twitter’s failure to use a full Cassandra system quite a few years back many jumped to call it a failure or to call Cassandra not mature enough or the most diplomatic commentary, a partial failure. I don’t see it that way I see it as two systems that provide different strengths working in harmony. Some suggested a need for a ‘hybrid database’ but I say why mess with a good thing if they can both be managed together with tools like Trove. I will leave you this as food for thought on that subject.


Corbett, J. C., et al. (2012) Spanner: Google’s Globally-Distributed Database. In USENIX (the Advanced Computing Systems Association), 10th USENIX Symposium of Operation Systems Design and Implementation (OSDI’12). Hollywood, CA, USA 8 -10- October 2012.Berkley, CA:USENIX Association

Kim, J. Y. and Schulzrinne, H. (2011) SipCloud: Dynamically Scalable SIP Proxies in the Cloud. In: ACM (Association for Computing     Machinery), IPTcomm ’11 Proceedings of the 5th International Conference on Principles, Systems and Applications of IP

Lakshman, A. and Malik, P. (2009) Cassandra: A decentralized structure storage system. ACM SIGOPS Operating System Review,
44 (2), pp.35 – 40 Telecommunications. Chicago, United States of America 01-02 August 2011. New York:ACM


Misconceptions Regarding SIP

I have been working with SIP in different capacities for a little over 8 years now and in that time I see the same RFC compliance issues being rehashed over. It seems that some people  have issues interpreting SIP RFC . This is understandable as SIP related issues are discussed through multiple RFCs and the main SIP RFC, 3261, is very long. Additionally if you aren’t a developer there is a good chance you might not be used to reading RFCs.

What I am trying to point out with this is post is that there is no one right way to do SIP but some things in SIP are non-negotiable. Its important to understand when reading RFC that MUST and MAY mean no options and optional respectively. It makes a big difference.

  • SIP is acceptable in both UDP and TCP

UDP is the most commonly used method (in my experience) due to is structure of being a request/response or offer/answer protocol thus making sure that requests are responded to or the session dies. So why is TCP necessary you may ask. It is due to the possibility of large packets. UDP packets have a size limit, per RFC 3261, of 65,535 bytes including IP and UDP headers, and sending in UDP over this limit will cause packet fragmentation. I came across this issue when dealing with video calls that tend to have longer SDPs and thus had to switch to sending in TCP.

RFC 3261 section 18:

     All SIP elements MUST implement UDP and TCP.  SIP elements MAY
    implement other protocols.

     Making TCP mandatory for the UA is a substantial change from RFC
     2543.  It has arisen out of the need to handle larger messages,

     which MUST use TCP, as discussed below.  Thus, even if an element
     never sends large messages, it may receive one and needs to be
     able to handle them.

  • Routing information is conveyed by the ‘Via’ and ‘Record-Route’ headers and not the ‘Contact’ header.

A misconception exists in which the ‘Contact’ is used to convey routing information but nothing could be farther from the truth. The contact conveys addressing information but not to where you should be sending the next packet. What is the difference between addressing and routing? Its simple. Two users, the UAC (caller) and UAS (callee), send from individual IPs. The ‘Record-Route’ forces you to send to a specific IP on the response and the ‘Via’s headers give you routing information naming IPs in a path. A ‘Contact’ header merely tells you what to insert in responding packets.  Here is an example:

Sent to 1.2.3.4

INVITE sip:18005551212@1.2.3.4 SIP/2.0
Record-Route: <sip:5.4.3.2:5060;lr;ftag=1234xYz>
Via: SIP/2.0/UDP 5.4.3.2:5060;branch=z9hG4bKzYx321.0
From: Joe <sip:17005553333@5.4.3.2:5060>;tag=1234xYz
To: John <sip:18005551212@1.2.3.4:5060>
Call-ID: 123456789abc@10.1.1.1
CSeq: 1 INVITE
Max-Forwards: 70
Contact: <sip:17005553333@6.2.6.6:5062>
Content-Type: application/sdp
Content-Length: 160

v=0
o= 3562541130 1 IN IP4 5.4.3.2
s=-
c=IN IP4 5.4.3.2
t=0 0
m=audio 43044 RTP/AVP 8 101
a=rtpmap:8 PCMA/8000
a=rtpmap:101 telephone-event/8000
a=fmtp:101 0-15


Sent to 5.4.3.2

SIP/2.0 200 OK
To: John <sip:18005551212@1.2.3.4:5060>;tag=123456789
From: Joe <sip:17005553333@5.4.3.2:5060>;tag= 1234xYz
Call-ID: 123456789abc@10.1.1.1
CSeq: 1 INVITE
Max-Forwards: 70
Via: SIP/2.0/UDP 5.4.3.2:5060;branch=z9hG4bKzYx321.0
Record-Route: <sip:1.2.3.4:5060;ftag=1234xYz;lr=on >
Record-Route: <sip:5.4.3.2:5060;lr;ftag=1234xYz>
Contact:  <sip:18005551212@5.6.7.8:5061>
Content-Length: 165
Content-Type: application/sdp

v=0
o=- 8571063 8571063 IN IP4 1.2.3.5
s=-
c=IN IP4 1.2.3.5
t=0 0
m=audio 16394 RTP/AVP 8  101
a=rtpmap:8 PCMA/8000
a=rtpmap:101 telephone-event/8000
a=fmtp:101 0-15

Sent to 1.2.3.4:

ACK sip:18005551212@5.6.7.8:5061 SIP/2.0
Route: <sip:1.2.3.4;ftag=1234xYz;lr=on>
Via: SIP/2.0/UDP 5.4.3.2:5060;branch=z9hG4bKzYx321.0
From: Joe <sip:17005553333@5.4.3.2:5060>;tag= 1234xYz
To: John <sip:18005551212@1.2.3.4:5060>;tag=123456789
Call-ID: 123456789abc@10.1.1.1
CSeq: 1 ACK
Max-Forwards: 70
Content-Length: 0

There are differences between a ‘Via’ and a ‘Record-Route’. A ‘Via’ is mandatory, has components to prevent looping (branch) and states protocol information but it reflects the information of the session initiators previous hops. A ‘Record-Route’ is always optional and forces an IP for further packets to be sent. Its used to force a route rather than identify a path. Tables 2 and 3 in section 20 of RFC 3261 gives explanation of what SIP headers are needed when and its a helpful tool when trying to play detective on a  rejected SIP packet.

The quotes from RFC 3261 to back this up is as follows:

Section 20.30

  The Record-Route header field is inserted by proxies in a request to
   force future requests in the dialog to be routed through the proxy.

Section 20.42

     The Via header field indicates the path taken by the request so far and
     indicates the path that should be followed in routing responses.

8.1.1.8 Contact

     The Contact header field provides a SIP or SIPS URI that can be used
     to contact that specific instance of the UA for subsequent requests.
     The Contact header field MUST be present and contain exactly one SIP
     or SIPS URI in any request that can result in the establishment of a
     dialog.  For the methods defined in this specification, that includes
     only the INVITE request.  For these requests, the scope of the
     Contact is global.  That is, the Contact header field value contains
     the URI at which the UA would like to receive requests, and this URI
     MUST be valid even if used in subsequent requests outside of any
     dialogs.

  • SDP attributes are not mandatory and if you don’t understand one ignore it

There have been accusations calls failing because of attributes the system in question doesn’t understand. However it is explicitly clear from RFC 2327 that non-standard (not IANA registered) attributes are allowed and if you don’t understand them, ignore them.

Section 6

  The`attribute’ mechanism (“a=” described below) is the primary means for
  extending SDP and tailoring it to particular applications or media.
 Some attributes (the ones listed in this document) have a defined
 meaning but others may be added on an application-, media- or
 session-specific basis.  A session directory must ignore any
attribute it doesn’t understand.

On the other hand its not a valid complaint to say an attribute is missing because as shown in the SDP options list in section 6 of RFC 2327 an attribute is never mandatory.

  • There are multiple methods for media negotiation

The model that I find myself most frequently working with has been an offer within SDP of the UAC’s INVITE and a response within the 200OK. This is not the only model. Just because a model is not supported by a specific system does not make it not RFC complaint. SIP is often referred to as an offer/answer protocol and there is more than one valid way to go about that.

I have seen INVITE’s lacking SDP and for the UAS to send an offer in the SDP of the 200OK and the answer to come in the ACK. This is also perfectly valid. I have seen quite a bit of it when converting from H323 to SIP.  The 100rel response to an INVITE with SDP is not totally uncommon either.

Table 1 in section 2.2 of RFC 6337 gives a great summary of the available methods for media negotiation and in which RFC they are mentioned:

         Offer                             Answer                            RFC           Ini   Est   Early
    —————————————————————————————————

    1. INVITE Req.               2xx INVITE Resp.        RFC 3261   Y      Y      N

    2. 2xx INVITE Resp.       ACK Req.                    RFC 3261   Y      Y      N

    3. INVITE Req.               1xx-rel INVITE Resp.  RFC 3262   Y      Y      N

    4. 1xx-rel INVITE Resp.   PRACK Req.             RFC 3262   Y      Y      N

    5. PRACK Req.               200 PRACK Resp.     RFC 3262   N      Y     Y

    6. UPDATE Req.             2xx UPDATE Resp.    RFC 3311  N    Y     Y

         Table 1: Summary of SIP Usage of the Offer/Answer Model

The Ini field states whether it can be used in the initial answer/offer thus only the first four models are available for the original negotiation. The Est field states  whether this method can update an existing session and Early states whether the method can update an existing session in an early dialog – meaning before the 2XX establishes the call (RFC 3261 section 12).

This basically states that there are 4 approved ways to go about the initial media negotiation.

  1. Original INVITE has SDP and the 2XX response does as well
  2. The 2XX response to the INVITE has SDP and the caller sends an ACK completing the media negotiation
  3. Original INVITE has SDP and when both sides support ‘100rel’, which is a parameter in the ‘Supported’ header, there can be a 100rel response sent
  4. The UAS sends a 100rel response to an INVITE if both sides support it and the caller then sends a ‘200 PRACK’ response.

Options 2 and 4 are the reverse of options 1 and 3. In 1 and 3 the UAC (the caller) offers to the UAS (callee) and the UAS responds to close the negotiation while 2 and 4 the UAS makes the offer and the UAC closes off the negotiation. Also note that as one side makes the offer and the other side chooses to create a session based on what it likes from the offer, the answer should be the final list stating the conditions of the session based on what you have been offered. Doing something like adding new codecs to the m= is not okay though there is no rule against sending multiple codecs in the response’s m= line but its not best practice.

RFC 6637

Section 5.1

     A UA should send an answer that includes as close an approximation to
     what the UA and its user are interested in doing at that time, while
     remaining consistent with the offer/answer rules of [RFC3264] and
     other RFCs.

RFC 3264

Section 6.1

       The media type of the stream in the answer MUST match that of the offer…
       For streams marked as sendrecv in the answer, the “m=” line MUST contain
       at least one codec the answerer is willing to both send and receive, from
       amongst those listed in the offer.

There is a lot more to discuss on the topic of codecs and media negotiation but that is a topic for a different post.

How to Reset an Auto-Increment Primary Key to 1

I was recently looking for a strategy to reset  the auto-increment primary key for an InnoDB table and could not find a straight answer. I pieced together a solution and it worked for both MyISAM and InnoDB tables for MySQL 5.5.  It involves a lot of table creation etc. but it seems to me to be the safest way to accomplish this goal without accidentally losing data.

If this is a table that is constantly being updated I suggest creating a new table to hold the new data in then creating an after trigger to insert the new records into. We then copy the older data into a third table to manipulate. I believe its smart even if  your table is not receiving constant inserts into the table to run these operations on a separate table.  If  a trigger is not necessary start from step 5.  If your table does not receive many inserts but does receive a lot of updates it would be wise to lock your table against write operations once you copy the data into the third table for manipulation so there are no data discrepancies.

I will refer to the original table as test, the new table as test_new and table we are manipulating as test_temp. The database used will be called test_db.

1) Create the new table. Make sure you are in the right database first:

mysql >USE test_db;

mysql (test_db) > CREATE TABLE IF NOT EXISTS test_new LIKE test;

2) Run a count on test to see how many rows you have in the table currently:

mysql (test_db) >SELECT COUNT(*) FROM test;

Then set the auto-increment on this table to be slightly more than the amount of rows the table will  increase by in the period between the current time and the time you run the trigger. You will have to calculate this based on what you see in your table:

mysql (test_db) >ALTER TABLE test_new AUTO_INCREMENT = xxx;

3) Create the after trigger:

mysql (test_db) >DELIMITER ;;
CREATE trigger insert_into_test_new
AFTER INSERT ON test
FOR EACH ROW BEGIN
INSERT INTO test2 (field1, field2, field3, field4)
VALUES (NEW.field1, NEW.field1, NEW.field2, NEW.field3, NEW.field4) ;
END ;;
DELIMITER ;

4) Check that the trigger has been inserted and that new entries are being inserted into the table:

mysql (test_db) >SHOW TRIGGERS  LIKE  ‘insert_into_test_new’;

mysql (test_db) >SELECT COUNT(*) FROM test_new;

5) Create a new table to manipulate the data, if you haven’t before make sure you are in the right database first:

mysql >USE test_db;

mysql (test_db) >CREATE TABLE IF NOT EXISTS test_temp LIKE test;

mysql (test_db) >INSERT IGNORE INTO test_temp SELECT * FROM test;

6) Manipulate the new table so that it the auto-increment field can be reset to 1. First we need to create a new primary key so that we can drop the old one:

mysql (test_db) >ALTER TABLE test_tmp DROP PRIMARY KEY,CHANGE id id int(11),ADD PRIMARY KEY (new_primary_key);

Please not that you can change the field type to whatever makes the most sense in your scenario. You can run SHOW CREATE TABLE test; to find this information out.

7) Drop the auto-increment id field:

mysql (test_db) >ALTER TABLE test_temp DROP id;

8) Change the auto-increment value to 1:

mysql (test_db) >ALTER TABLE test_temp AUTO_INCREMENT = 1;

9) Restore the primary auto-increment key, id. Again use the field type that works for your table:

mysql (test_db) >ALTER TABLE test_temp ADD id int(11) NOT NULL AUTO_INCREMENT FIRST, DROP PRIMARY KEY, ADD PRIMARY KEY (id);

This query will put your id field as the first column in the table which makes the most sense in my mind. If this does not work for you, replace the FIRST parameter in the above query with a different parameter, such as before or after a specific field.

10) Check your work, then insert the records from test_temp to test_new:

mysql (test_db) >SELECT * FROM test_temp ORDER BY alertid ASC Limit 1;

You should see that the id field is set to auto-increment id  1.

mysql (test_db) >INSERT IGNORE INTO test_new SELECT * FROM test_temp;

The insert ignore will keep any possible records from alerting that there are duplicate rows. It will only stop duplicate records if your table has another unique key.

11) Compare the two tables to see that the row count appears the same

mysql (test_db) >select count(*) from test_new;

mysql (test_db) >select count(*) from test;

12) Once this confirmed you can move remove the old table and replace it with the new one. I suggest that you keep the old table for a while to have in case any issues crop up if disk space isn’t an issue. You also need to drop your trigger at this point if you have created one:

mysql (test_db) >RENAME TABLE test TO test_old, test_new TO test;


mysql (test_db) >DROP TRIGGER IF EXISTS insert_into_test_new;

Check your work

mysql (test_db) >SHOW TRIGGERS  LIKE  ‘insert_into_test_new’;

You should not get any data back.

13) You can at this point the temporary table can be dropped if you wish. Again if you can afford to keep the test_old table I would recommend having it in case of discrepancies.

mysql (test_db) > DROP TABLE IF EXISTS test_temp;

Tips Linux HA Cluster on RHEL 6 – The Cluster Components

I spent a lot of time confused and in great frustration while trying to set up this model. There is a lot of information out there and a lot of it is hugely confusing. I wanted to lay down some basic principles to avoid some of the pain I experienced with this model. Below are some tips and basic clarifications that really made me understand the model and wrap my head around it.

1) There are two ways you can approach this model. One is using pacemaker and one is replacing pacemaker with resource manager. If you are using pacemaker do not start resource manager (rgmanager) even though you have to install it as a dependency to the other components. I accidentally tried to do a mixture of both and that was a big mess.

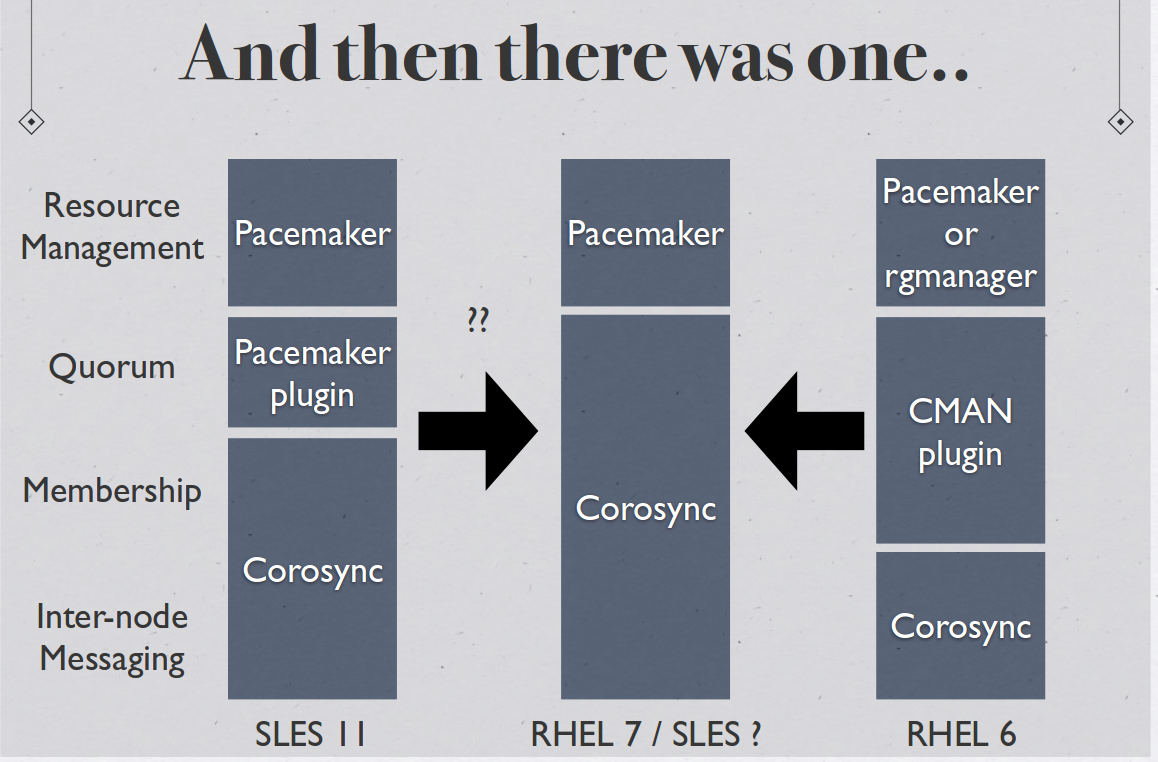
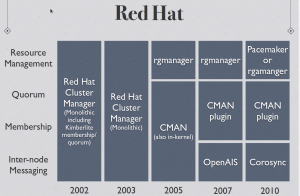
Andrew Beekhof of the pacemaker project provided me with some excellent diagrams to explain the progression of the HA Cluster for Redhat. The full pdf can be found here (https://www.dropbox.com/s/aj328jahoztv4w8/A%20Tale%20of%20Two%20Stacks.pdf):

HACluster2

HACluster3

2) If you are going to use pacemaker and not rgmanager (which I understand to be the better option for now) do not put your resources in /etc/cluster/cluster.conf. They should be handled by pacemaker.

3) There are two tools for setting up pacemaker, crmsh and pcs. Pcs doesn’t do with RHEL what it does with Fedora. Pcs lacks the ability to replace the crm tool in RHEL 6. Do not attempt to use it. You will run into problems.

4) If you see you are missing the crm binary but have a lot of crm_xxx binaries this means you have not actually installed the crmsh package. Crm used to be part of the pacemaker project and is not their own project under the package of crmsh. Therefore when you download pacemaker you will automatically have the crm_xxx binaries. If you want to be able to set up pacemaker via the crm command make sure you run a yum install crmsh command or you will not have it.

5) In the pacemaker model  CMAN – which is the front end for  corosync in RHEL currently – handles quorum and monitors nodes. Pacemaker handles and monitors resources. Setup your resources with pacemaker using crm and setup your nodes using ccs – which is the tool for /etc/cluster/cluster.conf file. I would suggest following the RedHat quickstart guide from cluster labs to get cluster.conf file set up (http://clusterlabs.org/quickstart-redhat.html).

6) In the setup using the redhat quickstart guide to you are only deferring the handling of fencing to pacemaker. You have not set up fencing and will need to do using the crm tool to choose a device to handle the fencing. For example if you are using a couple of IBM boxes you want to use the RSA to handle fencing.

7) You can follow this guide to set up fencing (http://clusterlabs.org/doc/en-US/Pacemaker/1.1-crmsh/html/Clusters_from_Scratch/ch09.html). While to many people fencing means STONITH (shoot the other node in the head) there are other options such as plain old isolation rather than restarting them. The IPs you put into a STONITH setup are the IPs of the device handling the fencing (such as an RSA) and not the IPs of the nodes. Each management device may be different so you need to understand what each device needs in order to be given a restart command. The different options you have also depend on the device you are using. I suggest you research it carefully. If you are using an RSA you can find some options here (http://linux.die.net/man/8/fence_rsa)

8) Its best not to have chkconfig on for any cluster components. You an start the cluster using pacemaker by only starting pacemaker. By cluster components that means Corosync, CMAN, pacemaker and whatever resources your cluster are managing, in my case it was DRBD and mysql.

9) Last piece of advice I can give you, and this might be the most valuable, if you get stuck you can find a chat on irc called #linux-cluster. There are a lot of people more than happy to answer your questions for you including Andrew Beekhof (beekhof) who is the pacemaker guy. He is located in Australia so if you want to speak to him specifically you need to hang out there during his hours or leave a message for him and he will see it when he is around. That said there are over 100 people who hang out there, some of them are using clusters actively who can give you advice no matter what setup you are using. Redhat seems to be the most confusing and the guy you want to speak to for accurate information about Redhat is Anderw Beekhof. If you aren’t pressed for time they have a mailing list as well which I think they prefer. That way the information is out there for the general public.


Configuration Steps for a MySQL cluster – if you are the Linux HA cluster it for a different purpose edit per your needs:

  • DRBD Setup using LVM

This setup is based on LVM disk partitioning so make sure the disk is set up on the operating system install accordingly.

Download Software

both nodes> yum –y install drbd kmod-drbd

Setup LVM. The LVM partition for this scenario is named system so that the path is the same on both nodes. Also something to consider upon installation. The size to set aside needs to be chose based on the expectations for the database/s this is set up for.

both nodes> lvcreate –mysql_drbd –size=20G system

Go to the drbd directory

server1> cd /etc/drbd.d

Create the config file as seen below in the config files section.  Edit it to match the necessary parameters of whatever system is being used and save.

server1> vi mysql.res

Copy it to the second node so that they are identical.

server1> scp mysql.res server2:/etc/drbd.d

Check the drbd.d directory has the global_common.conf file as well. This file contains general information for all the resources. It should come with the install. Nothing was changed until different replication types were tested. If the replication type is changed it would be in this file.

Create the drbd metadata.

Both> drbdadm create-md mysql

Reboot both boxes

Both> reboot now

start them both together. One will not start without its peer.

Both> service drbd start

Make sure everything is consistent and make one the primary. Once done a sync will occur.

server1> drbdam — –overwrite-data-of-peer primary mysql

Create the file system. If this is run this again at any other point it will wipe the existing data in the file system.

server1> mkfs.ext4 /dev/drbd0

Mount the file system to the mysql directory.

server1> mount /dev/drbd0 /var/lib/mysql

Check that it looks okay. If it does the correct amount of disk space will be applied to the directory

server1> df –h /var/lib/mysql

Output should look like

/dev/drbd0 20G usedM howmuchspaceleftG percentageinuse% /var/lib/mysql

Check all looks okay

server1> drbd-overview

Output should look like

0:mysql/0 Connected Primary/Secondary UpToDate/UpToDate A r—– /var/lib/mysql ext4 20G usedM howmuchspaceleftG percentageinuse%

Install MySQL

Both> yum –y install mysql-client mysql-server

At this point MySQL can be started and set up or have data imported to test all is well. Do not forget to shut down MySQL after testing is completed. Alternatively wait for the full setup to be completed befores setting up and starting up MySQL. Also unmounts the directory promte the primary to secondary so that the cluster resource manager can take over control of the components.

  • Pacemaker Setup

Both> yum install pacemaker cman ccs resource-agents crmsh

Create the cluster.

server1> ccs -f /etc/cluster/cluster.conf –createcluster pacemaker1

Add the nodes

server1> ccs -f /etc/cluster/cluster.conf –addnode server1

server1> ccs -f /etc/cluster/cluster.conf –addnode server2

Set fencing to defer to Pacemaker.

server1> ccs -f /etc/cluster/cluster.conf –addfencedev pcmk agent=fence_pcmk

server1> ccs -f /etc/cluster/cluster.conf –addmethod pcmk-redirect node1

server1> ccs -f /etc/cluster/cluster.conf –addmethod pcmk-redirect node2

server1> ccs -f /etc/cluster/cluster.conf –addfenceinst pcmk node1 pcmk-redirect port=node1

server1> ccs -f /etc/cluster/cluster.conf –addfenceinst pcmk node2 pcmk-redirect port=node2

Disable the need for quorum from CMAN. This will let the cluster function if only one node is up.

Both> echo “CMAN_QUORUM_TIMEOUT=0” >> /etc/sysconfig/cman

This will start everything for the Pacemaker cluster. No other components need to be started.

Both> service pacemaker start

As STONITH could not be supported it is disabled. If STONITH can be supported it is advised that it is used.

server1> pcs property set stonith-enabled=false

This will mean pacemaker will not require quorum so it can function with a single node if one dies.

server1> pcs property set no-quorum-policy=ignore

Failover after one reconnect attempt – To minimize downtime.

server1> pcs property set migration-threshold=1

I wanted the resources to stick to the box as long as things were working but to failover if a service failed to be restarted. A value of 0 would mean it always failed back and 100 would mean the box had to die to failover so it was set it to 51.

server1> pcs property set resource-stickiness=51

Set up the configurations in crm live mode.

server1> crm configure

Output:

crm(live)configure#

DRBD Resource Setup.

crm(live)configure# primitive p_drbd_mysql ocf:linbit:drbd params

drbd_resource=”mysql.res” op monitor interval=”15s”

Creating a master/slave relationship with DRBD.

crm(live)configure# ms ms_drbd_mysql p_drbd_mysql meta master-max=”1″ master-node-max=”1″ clone-max=”2″ clone-node-max=”1″ notify=”true”

The directions for mounting drbd to mysql directory as set up in the mysql.res file.

crm(live)configure# primitive p_fs_mysql ocf:heartbeat:Filesystem params device=”/dev/drbd0″ directory=”/var/lib/mysql” fstype=”ext4″

Setting up the virual IP.

crm(live)configure# primitive p_ip_mysql ocf:heartbeat:IPaddr2 params ip=”10.1.1.3″ cidr_netmask=”24″ nic=”eth0″

Setting up the MySQL instance.

crm(live)configure# primitive p_mysql ocf:heartbeat:mysql params

binary=”/usr/sbin/mysqld” config=”/etc/my.cnf” datadir=”/var/lib/mysql” pid=”/var/lib/mysql/mysql.pid” socket=”/var/lib/mysql/mysql.sock” user=”mysql” group=”mysql” additional_parameters=” –bind-address=10.1.1.3 –user=mysql” op start timeout=30s op stop timeout=30s op monitor interval=20s timeout=30s

So all the resources are handled as a group.

crm(live)configure# group g_mysql p_fs_mysql p_ip_mysql p_mysql

Make sure the mysql group created is on the same node as the drbd (ms_drbd_mysql) master.

crm(live)configure# colocation c_mysql_on_drbd inf: g_mysql ms_drbd_mysql:Master

Setting a startup order.

crm(live)configure# order o_drbd_before_mysql inf: ms_drbd_mysql:promote g_mysql:start

Save the configurations created above.

crm(live)configure# commit

Quit crm live.

crm(live)configure# quit

Make sure chkconfig is off on every service but DRBD. This means the service will not start up on when the server starts up. If it is off on Pacemaker it means the cluster will not start on startup but if a node is problematic and shut down or killed automatically putting it back into the cluster without knowing what the issue is can potentially cause more problems than automatically starting pacemaker on crash solves. RGManager and ricci have been added here because it has been installed it and it will interfere with pacemaker if it starts up.

Both>chkconfig mysql off

Both>chkconfig corosync off

Both>chkconfig cman off

Both>chkconfig rgmanager off

Both>chkconfig ricci off

Both>chkconfig pacemaker off

Both>chkconfig drbd on

  • Corosync Setup (should you choose to use it INSTEAD of Pacemaker

See the config file below as, unlike Pacemaker, this one can be edited.


Start CMAN.

Both>service CMAN start

Start resource manger to manage the service.

Both> service rgmanager start

Start the service that allows resorce manager to communicate with the nodes. Best to set chkconfg ricci on as well.

Both> service ricci start

Make sure chkconfig is off on every service but DRBD and ricci. If it is off for CMAN and rgmanager it means the cluster will not start on startup but if a node is problematic and shut down or killed automatically putting it back into the cluster without knowing what the issue is can potentially cause more problems than automatically starting pacemaker on crash solves. Pacemaker is included here because it has been installed it and it will interfere with RGManager if it starts up.

Both>chkconfig mysql off

Both>chkconfig corosync off

Both>chkconfig cman off

Both>chkconfig rgmanager off

Both>chkconfig ricci on

Both>chkconfig pacemaker off

Both>chkconfig drbd on


Configuration Files:

  1. server1 = 10.1.1.1
  2. server2 = 10.1.1.2
  3. VIP = 10.1.1.3
  • DRBD: mysql.res file

#mysql is the drbd resource

resource mysql {

net {

# Automatic split brain recovery policies

after-sb-0pri discard-zero-changes;

after-sb-1pri discard-secondary;

after-sb-2pri call-pri-lost-after-sb;

}

syncer {

verify-alg sha1;

}

# Identifying the two nodes server1 and server2 which are the servernames

on server1 {

device /dev/drbd0; #drbd device mounted linked to disk

disk /dev/system/mysql_drbd; #physical location drbd data stored

address 10.1.1.1:7788; #IP:Port for communication by nodes

meta-disk internal; #Metadata stored within DRBD

}

on server2 {

device /dev/drbd0; #drbd device mounted linked to disk

disk /dev/system/mysql_drbd; #physical location drbd data stored

address 10.1.1.2:7788; #IP:Port for communication by nodes

meta-disk internal; #Metadata stored within DRBD

}

}

  • Pacemaker Cluster.conf

#All this does is identify the nodes server1 and server2 as well as defer fencing (STONITH) to pacemaker

<cluster config_version=”63″ name=”pacemaker1″>

<fence_daemon/>

<clusternodes>

<clusternode name=”server1″ nodeid=”1″>

<fence>

<method name=”pcmk-redirect”>

<device name=”pcmk” port=”node1″/>

</method>

</fence>

</clusternode>

<clusternode name=”server2″ nodeid=”2″>

<fence>

<method name=”pcmk-redirect”>

<device name=”pcmk” port=”node2″/>

</method>

</fence>

</clusternode>

</clusternodes>

<cman/>

<fencedevices>

<fencedevice agent=”fence_pcmk” name=”pcmk”/>

</fencedevices>

<rm>

<failoverdomains/>

<resources/>

</rm>

</cluster>

  • Pacemaker configuration output – DO NOT EDIT THE FILE- this is a print out merely for comparison

<?Do not attempt to edit this directly, always use CRM!?>

<cib admin_epoch=”0″ cib-last-written=”Thu May 23 19:37:58 2013″ crm_feature_set=”3.0.7″ epoch=”182″ have-quorum=”1″ num_updates=”0″ update-client=”cibadmin” update-origin=”server2″ validate-with=”pacemaker-1.2″>

<configuration>

<crm_config>

<cluster_property_set id=”cib-bootstrap-options”>

<nvpair id=”cib-bootstrap-options-dc-version” name=”dc-version” value=”1.1.8-7.el6-394e906″/>

<nvpair id=”cib-bootstrap-options-cluster-infrastructure” name=”cluster-infrastructure” value=”cman”/>

<nvpair id=”cib-bootstrap-options-no-quorum-policy” name=”no-quorum-policy” value=”ignore”/>

<nvpair id=”cib-bootstrap-options-migration-threshold” name=”migration-threshold” value=”1″/>

<nvpair id=”cib-bootstrap-options-interval” name=”interval” value=”120s”/>

<nvpair id=”cib-bootstrap-options-last-lrm-refresh” name=”last-lrm-refresh” value=”1369046568″/>

<nvpair id=”cib-bootstrap-options-stonith-enabled” name=”stonith-enabled” value=”false”/>

<nvpair id=”cib-bootstrap-options-cluster-recheck-interval” name=”cluster-recheck-interval” value=”5s”/>

<nvpair id=”cib-bootstrap-options-failure-timeout” name=”failure-timeout” value=”30″/>

<nvpair id=”cib-bootstrap-options-resource-stickiness” name=”resource-stickiness” value=”51″/>

</cluster_property_set>

</crm_config>

<nodes>

<node id=”server1″ uname=”server1″/>

<node id=”server2″ uname=”server2″/>

</nodes>

<resources>

<master id=”ms_drbd_mysql”>

<meta_attributes id=”ms_drbd_mysql-meta_attributes”>

<nvpair id=”ms_drbd_mysql-meta_attributes-master-max” name=”master-max” value=”1″/>

<nvpair id=”ms_drbd_mysql-meta_attributes-master-node-max” name=”master-node-max” value=”1″/>

<nvpair id=”ms_drbd_mysql-meta_attributes-clone-max” name=”clone-max” value=”2″/>

<nvpair id=”ms_drbd_mysql-meta_attributes-clone-node-max” name=”clone-node-max” value=”1″/>

<nvpair id=”ms_drbd_mysql-meta_attributes-notify” name=”notify” value=”true”/>

</meta_attributes>

<primitive class=”ocf” id=”drbd_mysql” provider=”linbit” type=”drbd”>

<instance_attributes id=”drbd_mysql-instance_attributes”>

<nvpair id=”drbd_mysql-instance_attributes-drbd_resource” name=”drbd_resource” value=”mysql”/>

</instance_attributes>

<operations>

<op id=”drbd_mysql-monitor-29s” interval=”29s” name=”monitor” role=”Master”/>

<op id=”drbd_mysql-monitor-31s” interval=”31s” name=”monitor” role=”Slave”/>

</operations>

</primitive>

</master>

<group id=”g_mysql”>

<primitive class=”ocf” id=”fs_mysql” provider=”heartbeat” type=”Filesystem”>

<instance_attributes id=”fs_mysql-instance_attributes”>

<nvpair id=”fs_mysql-instance_attributes-device” name=”device” value=”/dev/drbd/by-res/mysql”/>

<nvpair id=”fs_mysql-instance_attributes-directory” name=”directory” value=”/var/lib/mysql”/>

<nvpair id=”fs_mysql-instance_attributes-fstype” name=”fstype” value=”ext4″/>

</instance_attributes>

</primitive>

<primitive class=”ocf” id=”ip_mysql” provider=”heartbeat” type=”IPaddr2″>

<instance_attributes id=”ip_mysql-instance_attributes”>

<nvpair id=”ip_mysql-instance_attributes-ip” name=”ip” value=”10.1.1.3″/>

<nvpair id=”ip_mysql-instance_attributes-nic” name=”nic” value=”eth0″/>

</instance_attributes>

</primitive>

<primitive class=”ocf” id=”p_mysql” provider=”heartbeat” type=”mysql”>

<instance_attributes id=”p_mysql-instance_attributes”>

<nvpair id=”p_mysql-instance_attributes-binary” name=”binary” value=”/usr/sbin/mysqld”/>

<nvpair id=”p_mysql-instance_attributes-config” name=”config” value=”/etc/my.cnf”/>

<nvpair id=”p_mysql-instance_attributes-datadir” name=”datadir” value=”/var/lib/mysql”/>

<nvpair id=”p_mysql-instance_attributes-pid” name=”pid” value=”/var/lib/mysql/mysql.pid”/>

<nvpair id=”p_mysql-instance_attributes-socket” name=”socket” value=”/var/lib/mysql/mysql.sock”/>

<nvpair id=”p_mysql-instance_attributes-user” name=”user” value=”mysql”/>

<nvpair id=”p_mysql-instance_attributes-group” name=”group” value=”mysql”/>

<nvpair id=”p_mysql-instance_attributes-additional_parameters” name=”additional_parameters” value=”–bind-

address=10.1.1.3 –user=mysql”/>

</instance_attributes>

<operations>

<op id=”p_mysql-start-0″ interval=”0″ name=”start” timeout=”30s”/>

<op id=”p_mysql-stop-0″ interval=”0″ name=”stop” timeout=”30s”/>

<op id=”p_mysql-monitor-10s” interval=”10s” name=”monitor” timeout=”30s”/>

</operations>

</primitive>

</group>

</resources>

<constraints>

<rsc_colocation id=”c_mysql_on_drbd” rsc=”g_mysql” score=”INFINITY” with-rsc=”ms_drbd_mysql” with-rsc-role=”Master”/>

<rsc_order first=”ms_drbd_mysql” first-action=”promote” id=”o_drbd_before_mysql” score=”INFINITY” then=”g_mysql” then-action=”start”/>

<rsc_location id=”location-p_mysql-server1-50″ node=”server1″ rsc=”p_mysql” score=”50″/>

</constraints>

<rsc_defaults>

<meta_attributes id=”rsc-options”>

<nvpair id=”rsc-options-resource-stickiness” name=”resource-stickiness” value=”100″/>

</meta_attributes>

</rsc_defaults>

</configuration>

  • Corosync Config file – must be edited:

<?xml version=”1.0″?>

<?cluster config_version gets updated with every edit so that it knows it has a new version to load?>

<cluster config_version=”59″ name=”mysql”>

<fence_daemon/>

<?Here the two nodes are identified: server1 as node1 and server2 as node2?>

<clusternodes>

<clusternode name=”server1″ nodeid=”1″/>

<clusternode name=”server2″ nodeid=”2″/>

</clusternodes>

<?Allows Cluster to stay up without both sets of cluster components being up?>

<cman expected_votes=”1″ two_node=”1″/>

<?There is no fencing due to lack of resources?>

<fencedevices/>

<rm>

<failoverdomains/>

<resources/>

<?Here is where the mysql service is set up which includes drbd mounting information and tying mysql to the vitural IP?>

<?when the ‘recovery’ parameter is not defined it tries to restart it before failing over?>

<service autostart=”1″ name=”mysql” recovery=”relocate”>

<drbd name=”mysql” resource=”mysql”>

<fs device=”/dev/drbd0″ fstype=”ext4″ mountpoint=”/var/lib/mysql” name=”mysql” options =”noatime”/>

</drbd>

<ip address=”10.1.1.3″ monitor_link=”1″/>

<mysql config_file=”/etc/my.cnf” listen_address=”10.1.1.3″ name=”mysql”/>

</service>

</rm>

</cluster>


Good Luck!